


Installing & Getting Started With Git On Debian/Ubuntu, Fedora 6, CentOS 6, RHEL 6 & Arch Linux
![]()
Prerequisites
To carry out the steps in this post you’ll require a free account with Github and any client computer running one of the many flavours of Linux operating system. Some of the recurring familiar distributions can be seen in the first step.
Sudo access is needed as usual for these commands, or failing that root access in its place.
Although not covered in this tutorial the remote server you interface with via Git can be your own VPS and not Github’s server’s if you wish. You can buy server hosting for this purpose from companies like Hoverdata, who focus on reliable server hosting with cost effective plans.
Introduction
Git is one of a sizable number of version control systems on offer to developers and administrators alike. It prides itself on being open source and unique in several areas, most notably in its use of “branches” which enable any number of remote local code repositories (that act entirely independent of one and other) to contribute to a central code base. Allowing multiple individual programmers to alter, delete, insert, or change the content of code/files and push it to the central Git server for improvement of the project.
Here we’ll see how to install and setup the base of Git to update an external public Github repository.
Step 1 — Install Git
The majority of users will use a package manager to install Git as it takes very little time to do so and is rather simplistic to run and acquire. Not to mention familiar to most. Our previous post focused around source code compilation which is entirely possible with Git too. So if you prefer you can follow the same process detailed prior to this for installing Git with the source code. Which is available on Github as expected.
Ubuntu / Debian
Fedora, CentOS, & RHEL
Arch Linux
Step 2 — Set user.name
The first item that we’ll set up is the user.name for this host’s identity.
After this is set any commits you issue from this host’s user are labelled with the value we set here.
Replace name in between the quote marks for the next command with the name you wish to appear as on future commits.
A commit is a your additions, alterations, deletions and changes to local repository code that you wish to update an external central repository with. Thereby changing the remote repository with your local changes and content.
Step 3 — Set email.name
The second setting we should provide is an email address you can be contacted at should another member of your team/project need to communicate with you.
The address like the name from before goes on your commit details.
There is a way to disable this address detail but it can help a great deal when working with others in version control systems like Git.
Step 4 — Conf file
Any items such as these set in the last two steps are held in a config file.
Use this command if you ever want to see the contents of this file.
Step 5 — Create Project Directory
Now create a directory you want to setup your Git project in.
We recommend creating it within your user’s home directory for ease of access and for the sake of this tutorial.
After doing this change into it with “cd”.
In here we’ll make a text file that can serve as the start of a readme file for the project.
This is only for example purposes and doesn’t need to contain anything substantial.
Step 6 — Initialise Git Project
Now enable this directory as a Git enabled environment with this command:
Then add our “README” file as part of the project with:
This means whenever we push to the remote server, alterations involving the readme file will be included as part of the update.
Step 7 — Commit The Change
This was mentioned several times early on and is the command you’ll use most often when interacting with Git.
Here we define our identity, including what actions we took with this commit.
By doing this we have record on what we changed or updated in the project. So that others working on the team know who has contributed to the code, and what they added exactly (or removed).
Step 8 — Create Remote Git Repository
Login to your Github account and create a public repository by clicking on the “+” icon at the top right of the page, and then selecting new repository option.
Fill in the details like in the next image, you can call the repo whatever you like however.
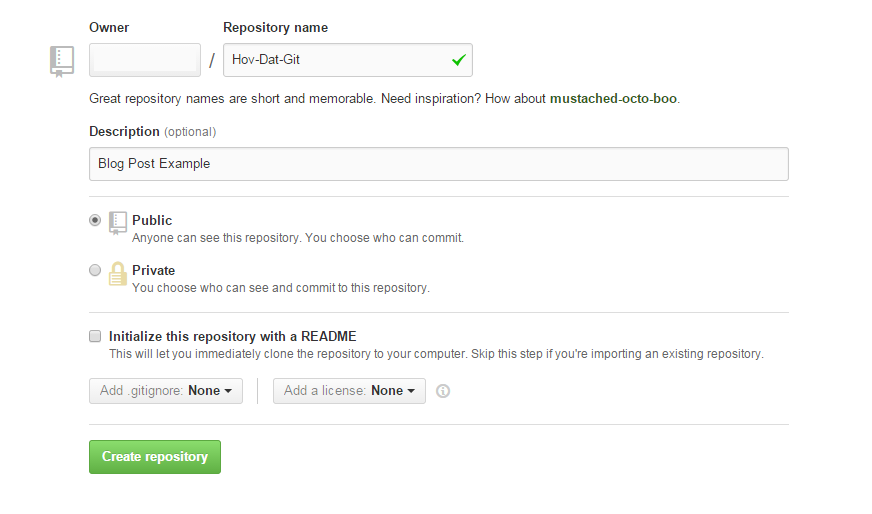
Github Repository Creation Screen
Once created you’ll see a few commands, one of which are the stages we’ve been following.
Move on to Step 9 to continue.
Step 9 — Add Remote Git Repository
So at this point it’s still an empty repository on the Github end.
To send and update it with our commit from step we have to first tell Git where the external Github repository is.
The repository address in the next command should be replaced with your own repo’s address from Github.
Where “username” is your Github username.
Our address here is just an example, use your own repository address that you are provided with upon creation.
Step 10 — Push Commit
Now comes the actual update to the remot Github server.
After doing this and authenticating the repository on Github matches our local repo’s contents.
Be sure to add any future files with the “git add” command and when working with other developers use the next pull command frequently to stay up to date with the remote repository changes commited by others.
Conclusion
This post is only an example of basic usage with the Git system. From here on there are many other possibilities available when using Git and to make use of use when developing. It is a good idea to set up SSH key authentication with Github too when possible.
Thanks for reading and we hope you found this useful in getting started with Git and Github.
Leave a Reply