


Installing & Using Aptitude CLI Front-end on Ubuntu/Debian

Prerequisites
This guide is intended for a Debian or Ubuntu derived Linux distribution. Which can be on a client machine or VPS (As long as you have SSH or even VNC access). You can buy VPS server hosting if needed via Hoverdata, who provide high quality server hosting at competitive prices.
Introduction
Within Debian derived Linux distributions such as Ubuntu, KNOPPIX, and LMDE a core tool users find themselves interacting with on a recurrent daily basis is the system’s Apt package manager. It’s through Apt (short for Advanced Package Tool) that the majority of available applications are installed, kept up to date, and if needed removed from the system.
It does this in conjunction with some other subsidiary system components, so is not alone in its exploits. There are also a long list of other purposes this package manager can fulfill, however the most basic and commonly used purposes are these aforementioned ones. Secondly Apt is responsible to a large degree for resolving any and all dependency issues, or conflicts that arise inside its internal package database.
Now we’re more familiar with what Apt is let’s take a look at Aptitude.
Aptitude

One novel method of interfacing with Apt available to administrators is to utilise a front-end to view the internal package database. Aptitude as named in the title is one of these. With Aptitude more visual control is gained over the system’s packages allowing you to have a clearer picture of the current content you have installed. Alongside this it allows you to handle the package management side of things without typing in the apt-get commands.
So let’s install the program and take a look.
Step 1 — Installing Aptitude
Installing the program is as easy as any other certified package you’re likely to encounter, as it’s maintained in the Debian/Ubuntu official repositories. Here is how it’s done:
Step 2 — Running Aptitude
Use the following command to run Aptitude in your current terminal session.
Step 3 — Updating & Installing/Removing
From here after running the program you can begin by pressing u which will proceed to update all system packages. This is the same as the apt-get update equivalent command.
Alternatively you can move to different categories by using your arrow keys, and then using ENTER to expand a category.
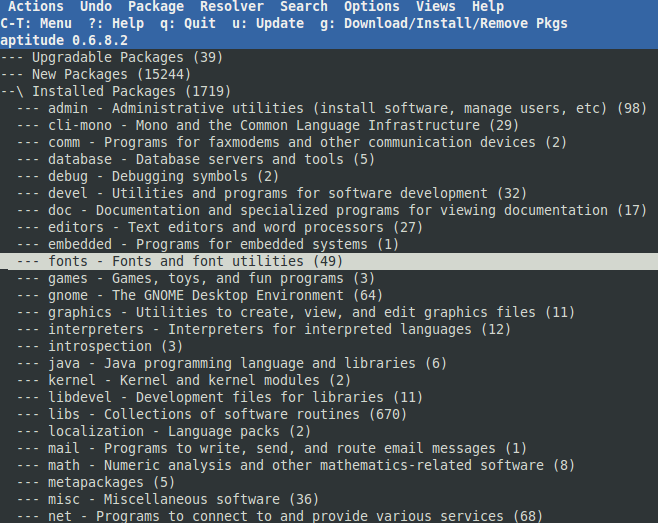
Depending upon your chosen category i.e. whether you are on “Installed” or “Not Installed” pressing g will either install or remove a selected package to the system.
Finally pressing ? will bring up a short help menu, and q will jump back through the chosen category tree or exit Aptitude completely if on the main home tree.
Step 4 — Accessing the Menu
At the top of the terminal you can see an expandable blue menu with several different options to choose from.
Aptitude Menu
Making use of this menu is important when using Aptitude, as it provides much of the functionality available.
Pressing the F10 key on your keyboard drops the focus into this menu and lets you navigate to the various options using your arrow keys on your keyboard again. Vim like navigation keys work here too instead of the directional arrows if you prefer it.
Note that on some systems depending upon your working environment, mouse support may also be working and provided.
It’s worth exploring/noting these options on offer and seeing if any might be useful to your admin duties. Some are indeed more useful than others. We’ll move onto to take a look at several of these you may instantly find familiar and of use.
Step 5 — Actions > Clean package cache & obsolete files
Installing, downloading, removing, and altering of packages plus dependencies over time creates left over data.
Mostly un-necessary packages that are now obsolete and can be removed to free up disk space. Helping to keep the Apt database clean and free of old files.

Clean/Obsolete
Step 6 — Package > Purge
When you uninstall a package using Aptitude or the apt-get command. Configuration files required to operate the program are not always removed entirely. Using this option rectifies this and actually “purges” everything involved in the running of the software.
The shortcut for this is an underscore: _

Purge
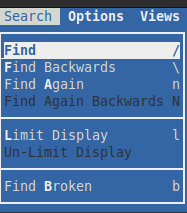
Step 7 — Search > Find
At times certain packages can be difficult to locate or find. Using this part of Aptitude helps determine what state a package is presently in, and if it’s even in the repositories of you distribution provider. Installing it if you want to is also easily done as you have now located it in the navigation tree.
The shortcut for this is an forward slash: /
Find
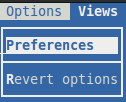
Step 8 — Options > Preferences
This area takes the form of a check-box list and most choices here are down to your personal preference. With this being said it is wise not to disable the first option as this will hide several of the arguably useful options. Less important options are those such as:
- “Prompt for confirmation at exit”
- “Closing the last view exits the program”
- “Use a ‘status-line’ download indicator for all downloads”
Enabling the “Hide the menu bar” check-box is a convenient way of getting more screen real estate if required such as in a tiling window manager environment, or smaller display. Only once you have become familiar with the shortcuts and general operation of Aptitude first though.
Preferences
Conclusion
This by no means covers everything inside of aptitude or what it is capable of (as you will have likely realised by now). It is enough to get started and familiar with its inner workings however, and I hope you find it useful. You can even run aptitude from the command line with different parameters instead of apt-get if preferred.
For example:
Enjoy!
Leave a Reply